Command Pattern
Overview
Invoker - Command - Receiver 관계로 호출자와 실행자의 관계를 디커플링하는 디자인패턴.
Why to use
Invoker (요청자)와 Receiver(실행자)의 타이트한 의존관계를 분리하여 변화에 유연한 구조를 만든다.
서로 의존관계가 타이트할 때 Receiver 코드가 변경되면, Invoker 코드도 변경이 불가피한 문제가 발생한다.
커맨드 패턴 도입 후 Receiver 코드 변경시 오로지 Command 만 영향받는다.
When to use
Invoker - Receiver 디커플링이 필요할 때
Invoker - Receiver Java Example
- Light
- Game
@Getter
public class Light {

    private boolean isOn = false;

    public void on() {
        if (this.isOn) {
            System.out.println("이미 불이 켜져있습니다.");
        } else {
            this.isOn = true;
        }
    }
    public void off() {
        if (!this.isOn) {
            System.out.println("이미 불이 꺼져있습니다.");
        } else {
            this.isOn = false;
        }
    }
}
@Getter
public class Game {
    private boolean isStarted = false;

    public void start() {
        if (isStarted) {
            System.out.println("이미 게임이 실행중입니다.");
            return;
        }
        System.out.println("게임 시작");
        this.isStarted = true;
    }

    public void finish() {
        if (!isStarted) {
            System.out.println("게임이 실행중이지 않습니다.");
        }
        System.out.println("게임 종료");
        this.isStarted = false;
    }
}
Button.java
@Getter
@RequiredArgsConstructor
public class Button {
    private final Light light;

    // toggle 버튼이라 상태전환 무조건 일어남.
    public void press() {
        if (this.light.isOn()) this.light.off();
        else this.light.on();
    }
}
나의 앱이 버튼(Invoker)을 통해 Game 혹은 Light 을 키고 끈다고 가정해보저.
여기서 Game, Light 가 Receiver 가 된다.
그럼 Receiver 가 바뀔 때마다 내 앱 클래스가 계속 변경되어야한다.
- LightApp
- GameApp
LightApp 은 Light (Receiver) 에 의존적이다.
@Getter
@RequiredArgsConstructor
public class LightApp {
    private final Light light;

    public void press() {
        this.light.off();
    }
}
GameApp 은 Game (Receiver) 에 의존적이다.
@Getter
@RequiredArgsConstructor
public class GameApp {
    private final Game game;

    public void press() {
        this.game.finish();
    }
}
GameApp 과 LightApp 은 사실상 거의 같은 코드다.
Invoker(GameApp, LightApp) 와 Receiver(Game, Light) 의 커플링 관계로 인해 거의 같은 코드가 반복되는 Invoker 클래스를 만들거나, 기존 Invoker 코드를 수정해야한다.
📝 이럴 때 커맨드 패턴으로 Invoker, Receiver 간 의존 관계를 분리할 수 있다.
How to use
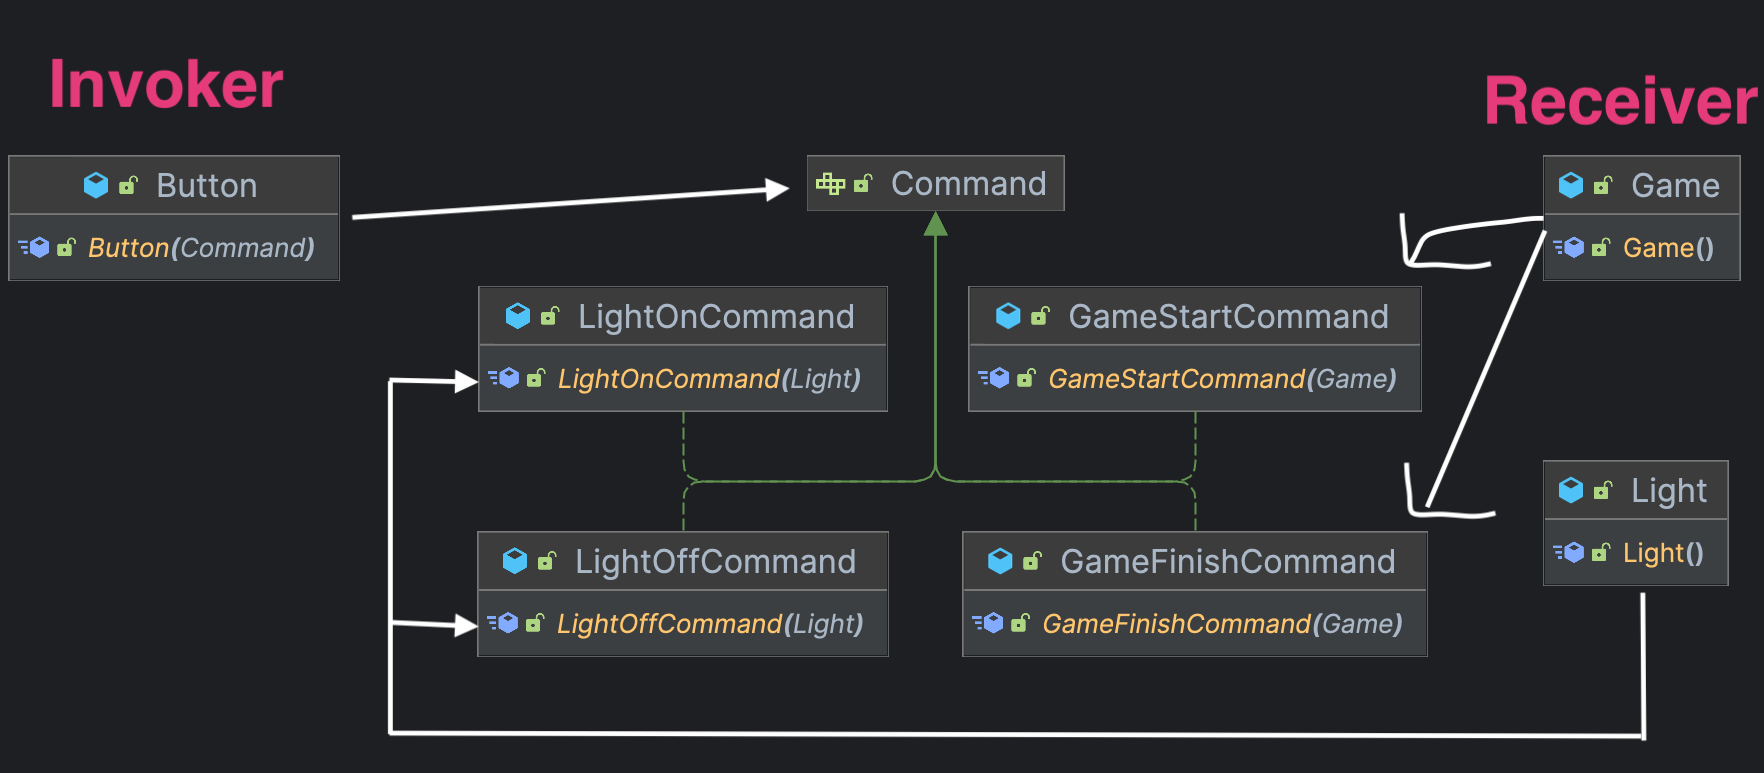
Command 인터페이스와 구현체를 아래와 같은 구조로 정의한다.
Receiver 코드가 변경되면 Invoker 는 영향을 받지 않고 오로지 Command 만 변경하면 된다.
Diagram

Command.java
public interface Command {
    // 오로지 실행만
    void execute();
}
- LightCommandOn
- GameCommand
@RequiredArgsConstructor
public class LightOnCommand implements Command {
    private final Light light;
    @Override
    public void execute() {
        this.light.on();
    }
}
@RequiredArgsConstructor
public class GameStartCommand implements Command {
    // Command 객체에서 굳이 game 객체에 접근해서 어떤 상태를 조작할 필요는 없다.
    // Command 는 오로지 '동작'이라는 책임만 갖는다.
    // 따라서 Getter 는 필요하지 않다.
    private final Game game;

    @Override
    public void execute() {
        this.game.start();
    }
}
ButtonTest.java
class ButtonTest {

    @DisplayName("On Off 버튼 커맨드와 함께 생성")
    @Test
    void lightButtonOnOffTest() {
        Light currentRoomLight = new Light();

        // 동일한 불빛을 전달받아 커맨드 생상자 주입
        Button onButton = new Button(new LightOnCommand(currentRoomLight));
        Button offButton = new Button(new LightOffCommand(currentRoomLight));

        onButton.press();
        assertThat(currentRoomLight.isOn()).isTrue();

        offButton.press();
        assertThat(currentRoomLight.isOn()).isFalse();
    }

    @DisplayName("게임 시작 - 종료 버튼 테스트")
    @Test
    void gameButtonTest() {
        Game game = new Game();
        Button gameStartButton = new Button(new GameStartCommand(game));
        Button gameFinishButton = new Button(new GameFinishCommand(game));

        gameStartButton.press();
        assertThat(game.isStarted()).isTrue();
        gameFinishButton.press();
        assertThat(game.isStarted()).isFalse();
    }
}
Pros and Cons
장점
Single Responsibility Principle (SRP) 준수.
- 하나의 커맨드가 오로지 하나의 책임만 갖는다.
- Receiver 코드 변경시 Invoker 코드가 영향받지 않는다.
단점
- 코드 복잡도 증가
